Checking Back In on Generativity
In an era of “generative” AI, what’s happening to “generativity”?

Skip ahead if you’re just here for the NAS instructions.
Nearly five years ago, I wrote about the concept of “generativity” and speculated that it was back, but at a different layer of the stack:
With open-source software and crazily inexpensive open-source hardware, one can pretty easily tinker with and connect multiple closed devices. I’ve connected my NestCam and my hand-made, $5 WiFi temperature and humidity sensors to Apple’s walled garden of a home automation system. Each input is on equal footing. And the result is a delightful system for my apartment.
It’s generativity, but at a different layer of the stack. I used to mess with the devices; now I mess with the network of devices. (And, if I’m willing — I can dive back into the device-level at any time.)
Will most people build their own home IoT devices? No. But most people didn’t build their own PCs. Those who did invented new ways of doing things. That was enough.
I’m revisiting this concept now, in light of the ready availability of generative AI tools like ChatGPT.
In essence, the argument from 2019 is increasingly true – computers are ever-more appliance like (hello, Apple Vision Pro, where you can’t even do what you’d like with the system during a demo!)… but the barrier to entry on making things at different layers of the stack is lower than ever.
A few projects I recently built are good examples, and the implications of easier access are profound.
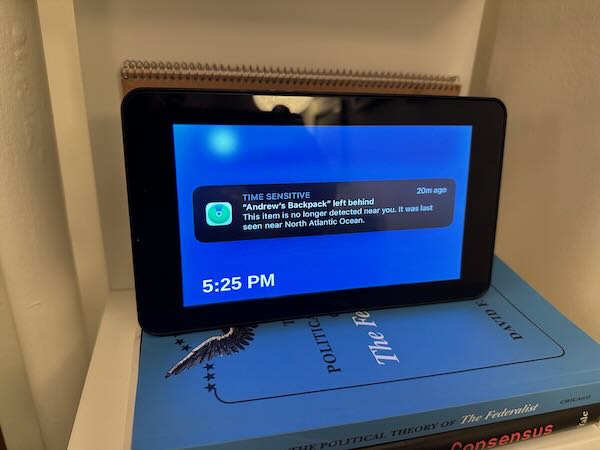
Perhaps the simplest example is of building my own digital picture frame. While there are commercial devices, few of them connect to my preferred photo storage system (iCloud Photo Library), and fewer still have smart cropping features to make all the photos look good, regardless of their aspect ratio.
With just the smallest bit of knowledge – that python could run scripts to generate HTML and that Chromium can run in kiosk mode, full screen on a Raspberry Pi… I had my own custom picture frame system. I asked for:
- A pull of my iCloud Photo “favorites” album
- To crop all the images to the exact size of my display, but with faces centered for portrait pictures, since the screen is landscape
- To randomize the order of images, and for them to rotate once per minute
- To display the current time in the lower-left corner
- To write the resulting work to a static HTML file
- To launch that file in a kiosk-mode browser
- And to run all this on boot

The point of all this isn’t to suggest the end of software developers, quite the contrary. When the barrier to entry is lower, it’s reasonable to expect there will be MANY more like me: lower-quality, quick-and-dirty, hacks-on-hacks developers. But, they’ll be solving actual problems for actual people.
Anyhow, glad to be back after the long time away. Instructions to configure your own NAS for Time Machine backups + other things below. And, of course, built with ChatGPT… with heavy modifications when the AI was flagrantly wrong.
Background: why, in 2024, am I making a NAS?
Network attached storage is a concept so old and a need so common, that when I retired my beloved Synology DS-412+ (it wasn’t getting security updates anymore) I imagined a simple, open-source replacement running on a Raspberry Pi would be the obvious choice. I also love a good little afternoon Pi project, and the new Raspberry Pi 5 had just arrived in my mailbox. I was looking forward to (a very specific kind of) fun.
I was also wrong.
The only one of the “NAS distros” that runs on ARM (and thus the Pi) is Open Media Vault. Fair or not, I found OMV to be utterly inscrutable. Rather than a friendly abstraction layer on top of linux/ext4/samba/rsync… It is something of an abstraction, but not one that I could easily wrap my head around. OMV demanded I understand the underlying system in addition to its own quirks.
What I wanted was to define shares, pick the protocols by which they could be accessed, and set quotas for Time Machine. But, I convinced myself that “learning is good,” and just pressed on.
After a few false starts, I had OMV running. I think it was enforcing quotas (though I was never sure), and I knew it was incredibly fragile. Any change risked bringing the system down. Eventually the fragility caught up with me: I destroyed my own backups though a misunderstanding of the UI. Rather than copying my data drive to my backup one with rsync, I copied my empty backup over the data. Entirely my fault. No blame.
But I was back at the beginning. So I set up the features I needed myself: a few SMB shares, one with a limit for Time Machine, and rsync access to another. Oh, and a nice Web interface, too.
After a ridiculous number of false starts and messing with EXT-4 quotas, I discovered Samba can just enforce a quota itself. All the instructions are below, as much for my documentation as to help others.
Prepping a fresh Raspberry Pi
- Get the latest updates to the system
pi@nas:~ $ sudo apt update && sudo apt upgrade -y
pi@nas:~ $ sudo reboot now
Initial Setup and Formatting USB Drives
- Identify USB Drives: First, list all connected devices to identify your USB drives.
lsblk -
Create a GPT Partition Table and Partition
 We'll use `gdisk` for creating a GPT partition table. If `gdisk` is not installed, you can usually install it via your distribution's package manager.

 ```bash
 sudo gdisk /dev/sdx
 ```
Replace
/dev/sdxwith the device identifier for your drive. Follow these steps withingdisk:* Type `o` to create a new empty GUID partition table (GPT). * Confirm the operation (this will erase the existing partition table on the drive) by typing `Y`. * Type `n` to add a new partition. - For the partition number, press `Enter` to use the default (1). - For the first sector, press `Enter` to use the default, which starts the partition at the beginning of the disk. - For the last sector, press `Enter` to use the maximum size available, or specify a size if you want a smaller partition (e.g., `+500G` for 500 GB). - For the hex code, you can press `Enter` to use the default Linux filesystem type or type `8300`. Type `w` to write the changes to the disk. * Confirm the operation by typing `Y`.
This process creates a new GPT with a single partition covering the entire drive.
- Format USB Drives to ext4: Replace
/dev/sdX1and/dev/sdY1with your actual drive identifiers. Warning: This will erase all data on the drives.sudo mkfs.ext4 /dev/sdX1 sudo mkfs.ext4 /dev/sdY1
Adding Users
- Add Users: For each user, use the following commands. Repeat for each user, replacing
USERNAMEaccordingly.sudo adduser USERNAME sudo usermod -aG users USERNAME
Make note of the drive information for mounting
```bash
lsblk -o NAME,MODEL,VENDOR,SIZE,MOUNTPOINT
```

Be sure to save the /dev/sdX and identify which drive that is physically.  For example:

```bash
pi@nas:~ $ lsblk -o NAME,MODEL,VENDOR,SIZE,MOUNTPOINT
NAME        MODEL                VENDOR    SIZE MOUNTPOINT
sda         One Touch Hub        Seagate   7.3T
└─sda1                                     7.3T
sdb         WDC WD80EDBZ-11B0ZA0 WD        7.3T
└─sdb1                                     7.3T
mmcblk0                                   29.8G
├─mmcblk0p1                                512M /boot/firmware
└─mmcblk0p2                               29.3G /
```

What's important here is that sda1 is going to be the NAS and sdb1 is goign to be the clone drive. ### Mounting Drives with UUID and Setting Up ext4 Quotas
- Get UUIDs of the Formatted Drives:
sudo blkid - Edit fstab to Mount Drives by UUID: Open
/etc/fstabwith a text editor likenano.sudo nano /etc/fstabAdd the following lines, replacing
UUID_xandUUID_ywith your drives’ UUIDs:UUID=UUID_x /mnt/nas ext4 defaults,nofail 0 0 UUID=UUID_y /mnt/clone ext4 defaults,nofail 0 0 - Create Mount Points and Mount the Drives:
Here we create the mount points, change them to be owned by the group “users” which is what all the actual users on the system are a part of (e.g. the two we added earlier), and then change the permissions to make them rwx for everyone on the system so Samba can also access them. Probably not optimal from a security perspective, but too annoying to do anything else.
sudo mkdir /mnt/nas /mnt/cloneThen we actually mount the drives and check they’re correct
 pi@nas:~ $ sudo mount -a
 mount: (hint) your fstab has been modified, but systemd still uses
    the old version; use 'systemctl daemon-reload' to reload.
 pi@nas:~ $ sudo lsblk
 NAME        MAJ:MIN RM  SIZE RO TYPE MOUNTPOINTS
 sda           8:0    0  7.3T  0 disk
 └─sda1        8:1    0  7.3T  0 part /mnt/nas
 sdb           8:16   0  7.3T  0 disk
 └─sdb1        8:17   0  7.3T  0 part /mnt/clone
 mmcblk0     179:0    0 29.8G  0 disk
 ├─mmcblk0p1 179:1    0  512M  0 part /boot/firmware
 └─mmcblk0p2 179:2    0 29.3G  0 part /
At this point you might also reboot to make sure the drives come back the way you expect.
Setting Up Folders for Shares
- Create Required Directories for Shares and Set Permissions
sudo mkdir /mnt/nas/anagram /mnt/nas/paperless /mnt/nas/timemachine
  sudo chown -R :users /mnt/nas
 sudo chmod -R 777 /mnt/nas
 sudo chown -R :users /mnt/clone
 sudo chmod -R 777 /mnt/clone
Configuring Samba Shares and Users
- Install Samba:
sudo apt-get update sudo apt-get install samba samba-common-bin - Configure Samba for Shared Folders: Append the following to
/etc/samba/smb.conf.sudo nano /etc/samba/smb.conf- Add Mac specific options to the global section:
############# Mac Specific Options ############# fruit:aapl = yes fruit:nfs_aces = no fruit:copyfile = no fruit:model = RackMack inherit permissions = yes - Add the share configurations in the Share Definitions section at the end, and delete all the other shares: ```ini [anagram] path = /mnt/nas/anagram valid users = @users writable = yes browseable = yes
- Add Mac specific options to the global section:
[paperless] path = /mnt/nas/paperless valid users = @users writable = yes browseable = yes
[timemachine] # Load in modules (order is critical!) vfs objects = catia fruit streams_xattr fruit:time machine = yes fruit:time machine max size = 2000G comment = Time Machine Backup path = /mnt/nas/timemachine available = yes valid users = @users browseable = yes guest ok = no writable = yes ```
- Setting Samba User Passwords: For each user, use the following commands. Repeat for each user, replacing
USERNAMEaccordingly.sudo smbpasswd -a USERNAME - Restart Samba:
sudo systemctl restart smbd
Creating paperlessbackup User and Setting Up Rsync Server
- Add
paperlessbackupUser:sudo adduser paperlessbackup - Install and Configure Rsync:
sudo apt-get install rsync sudo nano /etc/rsyncd.conf- Add configuration for the
paperlessfolder: ```ini/etc/rsyncd: configuration file for
rsync daemon mode
- Add configuration for the
See rsyncd.conf man page for more options.
[paperless] path = /mnt/nas/paperless comment = Backup for Paperless-ngx documents list = true uid = pi gid = users read only = false ```
- Start Rsync Server:
sudo systemctl start rsync - Set Rsync to Run at Boot
systemctl enable rsync
Installing FileBrowser for web-based share access
- Install FileBrowser
We’ll use the FileBrowser automatic installation script.
curl -fsSL https://raw.githubusercontent.com/filebrowser/get/master/get.sh | bash - Set up FileBrowser to run as a service
We’ll set up FileBrowser to run as a service, and share the
/mntdirectory, so we get all our shares.sudo nano /etc/systemd/system/filebrowser.serviceAnd then add the following to the file:
 [Unit]
 Description=Filebrowser
 After=network-online.target

 [Service]
 User=root
 Group=root

 ExecStart=/usr/local/bin/filebrowser -p 80 	-r /mnt/

 [Install]
 WantedBy=multi-user.target
Then we start filebrowser and set it up to keep running:
sudo systemctl start filebrowser
Scheduling Rsync Task
- Edit Crontab for Scheduled Backup:
sudo crontab -e- Add this line to clone
/mnt/nas
- Add this line to clone
to /mnt/clone nightly at 12:30 AM:
cron
     30 0 * * * rsync -a --delete /mnt/nas/ /mnt/clone/
Ensure you replace USERNAME, UUID_x, UUID_y, /dev/sdX, /dev/sdY, and PASSWORD with appropriate values for your setup. These instructions aim to be directly executable, but always review and adjust commands as necessary for your specific environment and device identifiers.
